
Artikel ini merupakan lanjutan dari instalasi NGINX dan APACHE
Apa itu Reverse Proxy ?
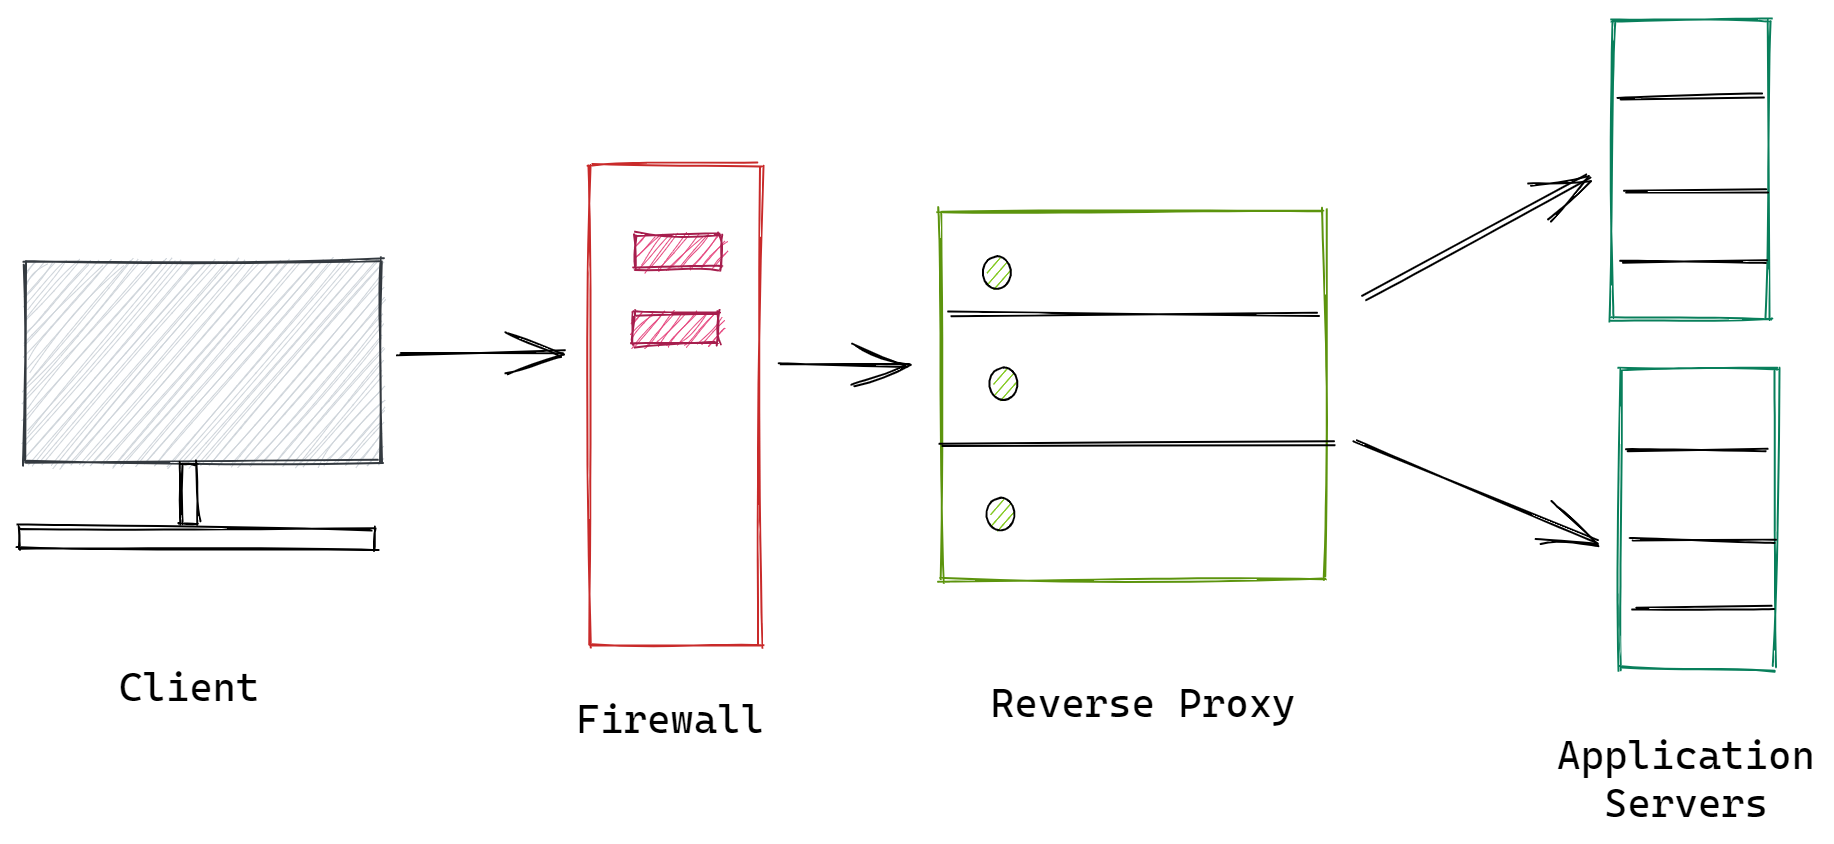
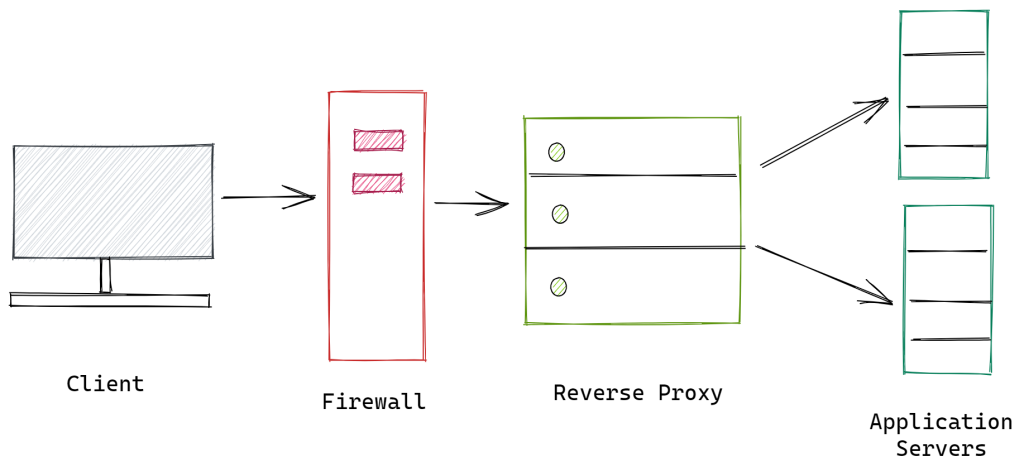
Reverse Proxy adalah sebuah server yang berfungsi untuk meneruskan request client ke server. Reverse Proxy terletak di antara aplikasi internal dan akan bekerja ketika client melakukan request ke server, maka server proxy akan meneruskan traffic ke backend kemudian server merespon dan client menerima respon dari server.
Reverse proxy sangat berguna untuk menyeimbangkan kinerja beban antar server (workload). Biasanya reverse proxy akan diimplementasikan oleh NGINX dan APACHE. Untuk lebih jelasnya berikut adalah gambar singkat (sumber: https://www.atatus.com/blog/content/images/2021/09/Reverse-Proxy.png)
Configure HTTPD
Pastikan dapat login ke server menggunakan root dan pastikan sudah mengikuti tutorial cara instalasi NGINX dan APACHE karena saya akan langsung melakukan konfigurasi. Urutan konfigurasi akan saya lakukan sebagai berikut:
- Memastikan NGINX dan APACHE terinstall
- Merubah port default apache 80 menjadi 8080
- Menambahkan direktori vhosts
- Membuat vhosts untuk ujicoba reverse proxy
- Membuka port 8080 pada firewalld
1 2 3 4 5 6 7 8 9 10 11 12 13 14 15 16 17 18 19 20 21 22 23 24 25 26 27 28 29 30 31 32 33 34 35 36 37 38 39 40 41 42 | [root@iaasweb ~]# httpd httpd (pid 1261) already running [root@iaasweb ~]# nginx -t nginx: the configuration file /etc/nginx/nginx.conf syntax is ok nginx: configuration file /etc/nginx/nginx.conf test is successful [root@iaasweb ~]# nano /etc/httpd/conf/httpd.conf --- -- --- # ports, instead of the default. See also the <VirtualHost> # directive. # # Change this to Listen on specific IP addresses as shown below to # prevent Apache from glomming onto all bound IP addresses. # #Listen 12.34.56.78:80 #Listen 80 Listen 8080 --- -- --- # Supplemental configuration # # Load config files in the "/etc/httpd/conf.d" directory, if any. IncludeOptional conf.d/*.conf # tambahkan direktori vhosts IncludeOptional /etc/httpd/conf/vhosts/*.conf [root@iaasweb ~]# mkdir -p /etc/httpd/conf/vhosts [root@iaasweb ~]# nano /etc/httpd/conf/vhosts/mnginx.iaas.web.id <VirtualHost *:8080> ServerName www.mnginx.iaas.web.id ServerAlias mnginx.iaas.web.id DocumentRoot /var/www/mnginx.iaas.web.id ErrorLog /var/www/mnginx.iaas.web.id/error.log CustomLog /var/www/mnginx.iaas.web.id/requests.log combined </VirtualHost> [root@iaasweb ~]# firewall-cmd --permanent --add-port=8080/tcp success [root@iaasweb ~]# firewall-cmd --reload success [root@iaasweb ~]# netstat -tulpn | grep 8080 tcp6 0 0 :::8080 :::* LISTEN 1261/httpd |
Configure NGINX
Langkah selanjutnya, saya akan menambahkan beberapa konfigurasi pada nginx diantaranya sebagai berikut:
- Memastikan /etc/nginx/conf.d/*.conf sudah ditambahkan pada nginx.conf
- Membuat include file untuk vhosts untuk memudahkan pembuatan blok server baru apabila ada domain atau subdomain untuk ditambahkan
1 2 3 4 5 6 7 8 9 10 11 12 13 14 15 16 17 18 19 20 21 22 23 24 25 26 27 28 29 30 31 32 33 34 | [root@iaasweb ~]# nano /etc/nginx/nginx.conf http { --- -- --- # Load modular configuration files from the /etc/nginx/conf.d directory. # See http://nginx.org/en/docs/ngx_core_module.html#include # for more information. include /etc/nginx/conf.d/*.conf; [root@iaasweb ~]# nano /etc/nginx/conf.d/vhosts.conf include /etc/nginx/conf.d/vhosts/*.conf; [root@iaasweb ~]# mkdir -p /etc/nginx/conf.d/vhosts [root@iaasweb ~]# nano /etc/nginx/conf.d/vhosts/mnginx.iaas.web.id server { listen 80; listen [::]:80; root /var/www/mnginx.iaas.web.id; index index.html index.htm; server_name mnginx.iaas.web.id www.mnginx.iaas.web.id; include snippets/phpmyadmin.conf; location / { try_files $uri $uri/ =404; } location ~ .*\.(php|jsp|cgi|pl|py)?$ { proxy_pass http://10.177.10.14:8080; proxy_set_header Host $host; proxy_set_header X-Real-IP $remote_addr; proxy_set_header X-Forwarded-For $proxy_add_x_forwarded_for; proxy_set_header X-Forwarded-Proto $scheme; } } |
Configure Directory
Setelah pembuatan file dan direktori vhosts selesai, langkah selanjutnya adalah membuat root direktori pada vhosts yang berfungsi untuk menyimpan isi file website
1 2 3 4 5 6 7 8 9 | [root@iaasweb ~]# mkdir -p /var/www/mnginx.iaas.web.id [root@iaasweb ~]# echo "MNGINX VHOSTS" > /var/www/mnginx.iaas.web.id/index.html [root@iaasweb ~]# echo "<?php phpinfo(); ?>" > /var/www/mnginx.iaas.web/info.php [root@iaasweb ~]# systemctl restart nginx httpd [root@iaasweb ~]# apachectl configtest Syntax OK [root@iaasweb ~]# nginx -t nginx: the configuration file /etc/nginx/nginx.conf syntax is ok nginx: configuration file /etc/nginx/nginx.conf test is successful |
Logging
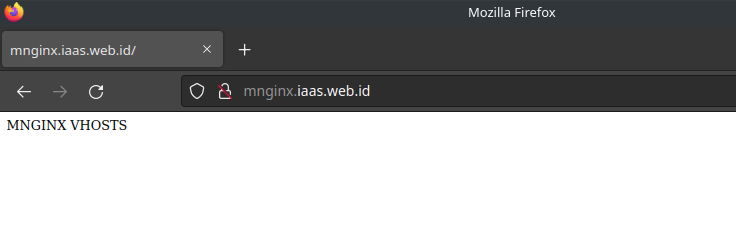
Tahap terakhir adalah memastikan bahwa NGINX dan APACHE benar-benar bekerja, saya akan mengakses info.php dan index.html terlebih dahulu
Tampilan http://domain.tld/index.html
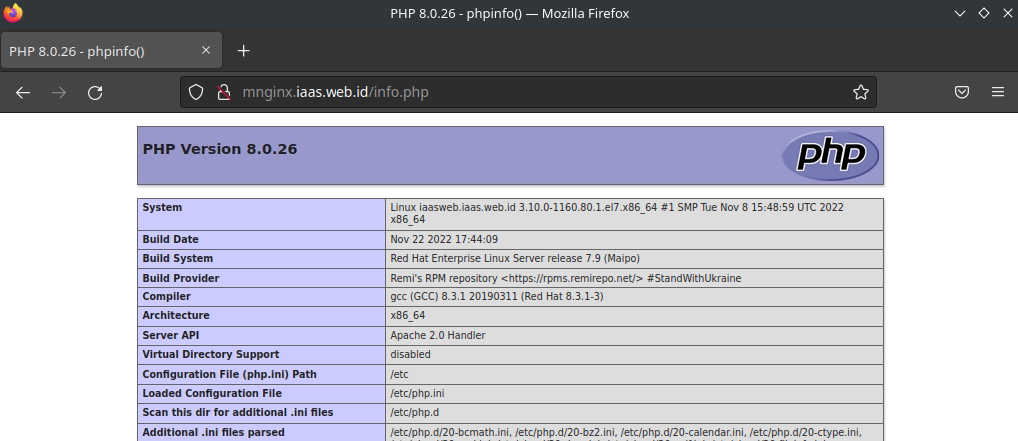
Tampilan http://domain.tld/index.php
Selanjutnya saya akan melihat request pada server pergi kemana dan melihat webserver nginx yang bekerja pada port 80 untuk melihat request dan webserver yang digunakan saya akan melakukan beberapa langkah berikut:
- Inspect element melalui browser
- Cek melalui info.php
- nginx log
- apache log
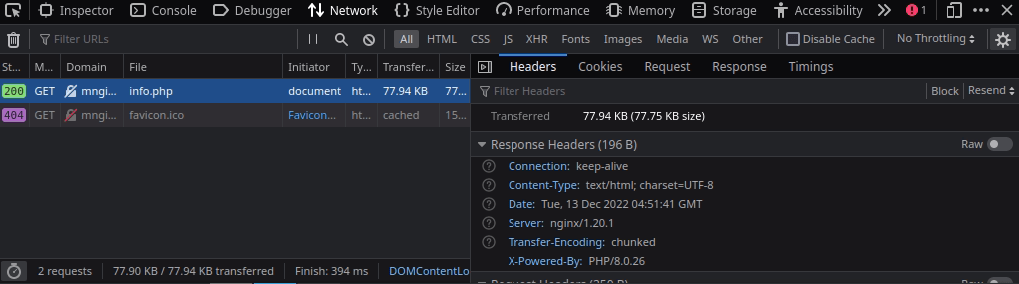
Untuk melihat webserver yang berjalan pada port 80 saya melakukan inspect element pada google chrome caranya adalah klik kanan Inspect > Network > Headers > Response Headers dan betul saja terlihat server: nginx/1.20.1
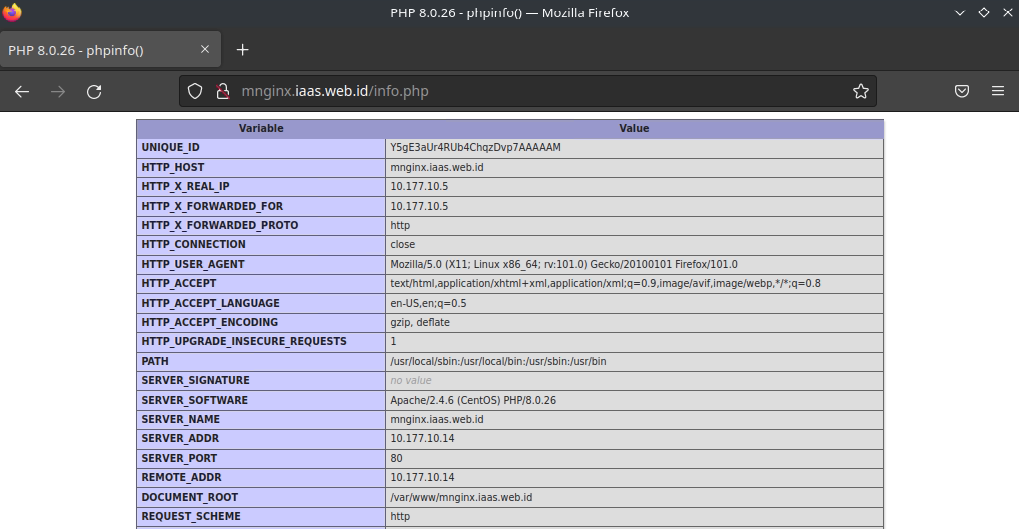
Cara berikutnya adalah melihat melalui info.php perlu diperhatikan beberapa parameter kali cukup:
- Server API
- SERVER_SOFTWARE
Pada parameter Server API artinya jika PHP dijalankan oleh Apache maka reverse proxy berhasil
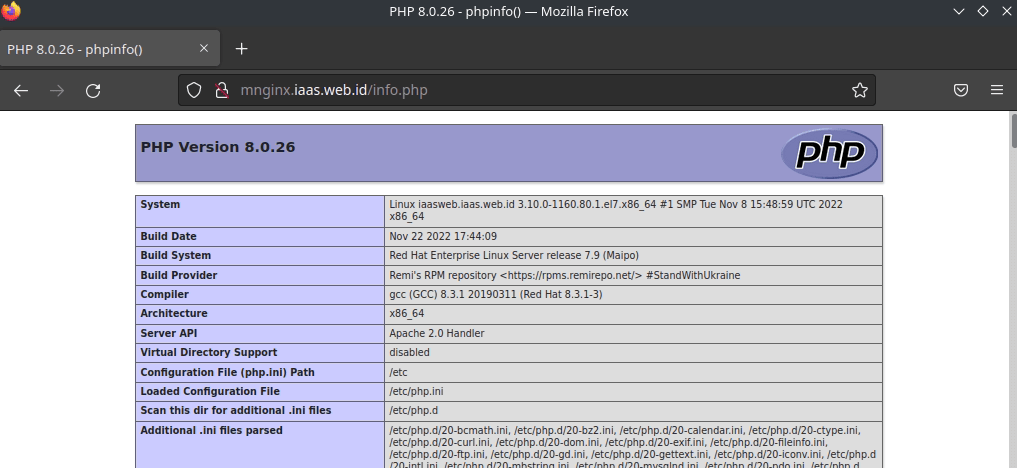
Pada parameter SERVER_SOFTWARE apabila menunjukkan Apache/2.4.6 maka reverse proxy yang dibuat sudah otomatis berhasil dan request client di forward menuju backend Apache
Cek request index.html file pada nginx
1 2 3 4 5 | [root@iaasweb ~]# tail -f /var/log/nginx/access.log 10.177.10.5 - - [13/Dec/2022:12:07:18 +0700] "GET /index.html HTTP/1.1" 200 14 "-" "Mozilla/5.0 (X11; Linux x86_64; rv:101.0) Gecko/20100101 Firefox/101.0" "-" 10.177.10.5 - - [13/Dec/2022:12:07:19 +0700] "GET /index.html HTTP/1.1" 304 0 "-" "Mozilla/5.0 (X11; Linux x86_64; rv:101.0) Gecko/20100101 Firefox/101.0" "-" 10.177.10.5 - - [13/Dec/2022:12:07:19 +0700] "GET /index.html HTTP/1.1" 304 0 "-" "Mozilla/5.0 (X11; Linux x86_64; rv:101.0) Gecko/20100101 Firefox/101.0" "-" 10.177.10.5 - - [13/Dec/2022:12:07:20 +0700] "GET /index.html HTTP/1.1" 304 0 "-" "Mozilla/5.0 (X11; Linux x86_64; rv:101.0) Gecko/20100101 Firefox/101.0" "-" |
Cek request info.php file pada apache
1 2 3 4 5 | [root@iaasweb ~]# tail -f /var/www/mnginx.iaas.web.id/requests.log www.mnginx.iaas.web.id 10.177.10.14 - - [13/Dec/2022:12:08:23 +0700] "GET /info.php HTTP/1.0" 200 79613 "-" "Mozilla/5.0 (X11; Linux x86_64; rv:101.0) Gecko/20100101 Firefox/101.0" www.mnginx.iaas.web.id 10.177.10.14 - - [13/Dec/2022:12:08:25 +0700] "GET /info.php HTTP/1.0" 200 79613 "-" "Mozilla/5.0 (X11; Linux x86_64; rv:101.0) Gecko/20100101 Firefox/101.0" www.mnginx.iaas.web.id 10.177.10.14 - - [13/Dec/2022:12:08:27 +0700] "GET /info.php HTTP/1.0" 200 79613 "-" "Mozilla/5.0 (X11; Linux x86_64; rv:101.0) Gecko/20100101 Firefox/101.0" www.mnginx.iaas.web.id 10.177.10.14 - - [13/Dec/2022:12:08:29 +0700] "GET /info.php HTTP/1.0" 200 79613 "-" "Mozilla/5.0 (X11; Linux x86_64; rv:101.0) Gecko/20100101 Firefox/101.0" |
Perlu diingat pada blok server vhosts mnginx.iaas.web.id.conf sudah di setting apabila file statik akan di serve oleh nginx sedangkan php akan di forward ke apache.